How to Make your Own Shade and Element Screens.
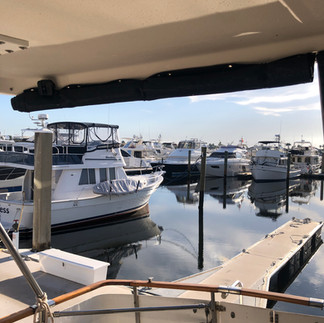
Picture this: the sun is shining, the water is glistening, and you're ready to enjoy a steaming cup of coffee on your deck. A great way to start the day. But wait, the sun is already beating on your face, and the temps are heating up.

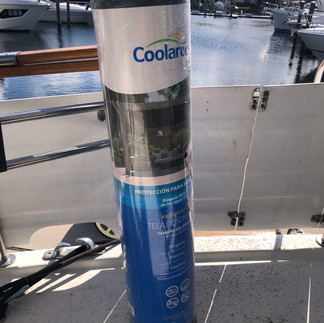
If you have an older boat like we do, no canvas surround for the deck came with the boat. This is usually fine with us because it's a covered deck, but the wind and sun still beat us. That's where Coolaroo shade fabric with 90% UV protection comes into play. It provides much-needed relief from the sun and blocks a lot of the rain that comes in from a nasty storm. In Southwest Florida, the rain comes in bucket form; no drizzles here.
In this how-to, we'll walk you through the steps to create shade fabric for the back of your boat's aft deck, ensuring a comfortable experience. It should be mentioned that this project could be applicable to use on a patio and in RVs or vans. The basic procedure is the same. The only thing that changes is where you are applying it.
When we started this project, we weren't sure if the look of this would turn out how we envisioned it or if it would look like the hillbillies had just arrived. Luckily, the plan was executed well, especially since this was the first time we'd used this type of product. Engineering the screens was a bit daunting because there's that saying, measure twice, cut once. Well, even when we measure twice, sometimes angles and other things come into play, and we had some places where we had too much overage, and at the same time, we found ourselves short in others.
The main takeaway is this, get more fabric than you think you need. Not just a little, but a lot more. You'll find other uses for the excess fabric. The same goes for the other tools and hardware. As it turns out, you'll end up wasting grommets that don't punch right and snaps that refuse to snap. We bought all of our supplies from Amazon. That's not a big surprise, but it made sourcing much easier. Make sure that whatever you purchase is for outdoor use, and if you are making something for your boat, be sure it is marine grade. If you don't live near salt water, marine grade is probably not as essential, but getting rustproof is the most crucial factor.


Step 1: Gather Your Materials
Before you begin this project, ensure you have all the necessary materials. Here's what you'll need:
- Coolaroo shade fabric (ensure it has 90% UV protection)
- Measuring tape
-Butcher's paper or anything on a roll, even wrapping paper, will work (for making a pattern)
-White chalk or tailor's chalk
-Pencil
-Ruler or straight edge
- Scissors
- Grommet kit (Rustproof Solid Brass, 3/8-Inch)
-Grommet pliers. (optional but highly recommended)
-Canvas Snap Kit Tool, Marine Grade 3/8" Socket Stainless Steel (optional-read steps first before you purchase)
-Snap pliers. (again, optional but recommended)
- Reusable Cable Ties with Hook and Loop OR Bungee rope
- Drill
- Optional: sewing machine with heavy-duty needle (if you prefer to hem the edges)
Step 2: Measure and Cut the Fabric
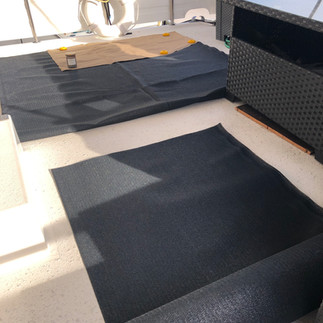
Start by measuring the dimensions of the area you want to cover on the back of your boat's aft deck. Be sure to add one to two extra inches on each side to account for hemming or folding the edges. Once you have your measurements, lay out the paper roll to make a pattern. If you are confident making the outline directly on the fabric, go for it. Using the chalk, draw the shape of the fabric using a straight edge or ruler and the dimensions from the measurements.
Next, carefully cut the Coolaroo shade fabric to size using scissors.
Step 3: Hem or Fold the Edges (Optional)
You can hem the edges to give your shade fabric a clean and finished look. If you have a sewing machine, fold the edges over and sew along the perimeter of the fabric. If sewing isn't your forte, you can achieve a similar result by folding the edges and securing them with fabric glue or hemming tape. Be careful not to use a heat tool on the hem as it will likely melt the shade cloth.
Step 4: Install the snaps (optional)
If you have existing snaps installed from the previous canvas, you can reuse those snaps for this project. Just make sure you buy the same snap size. While there are a variety of sizes, we ended up with 3/8", which seems to be a relatively standard size.
**If you do not have snaps and are installing this using grommets and bungee cording, skip this step.
We went the snap route for part of this project and then used grommets to secure the screens' bottoms to the railing. (See images)
If applicable, install the snaps at the top of the screen and on the sides according to the snap placement already in place. Starting with the top edge of the screen, make the first mark with the chalk, and then measure the snap placement from there. Once you have accurately marked where the snaps need to be applied, use the snap pliers to install the top and side snaps.
Step 5: Install Grommets
Install grommets along the edges of the shade fabric using a grommet kit and a drill. Space them evenly apart, ensuring enough grommets to securely fasten the fabric to your boat's aft deck rail. Grommets will provide sturdy anchor points for attaching the shade fabric.
Step 6: Attach the Shade Fabric to Your Boat
With the grommets in place, it's time to attach the shade fabric to the back of your boat's aft deck. Depending on your preference and the layout of your boat, you can use rope, bungee cords, or other fastening methods to secure the fabric in place. Pull the fabric taut to prevent sagging and ensure maximum coverage. For our application, we used hook and loop ties. You can find them in a variety of colors and sizes. We chose black because our shade cloth matches the trim on our boat. We went with hook and loop ties for ease of adjustment and removal. Sometimes, we like to roll the shades up and allow the deck to be open. The ties double as a way to secure the rolled shades.
Care and maintenance:
The thing about this shade cloth is that it doesn't require much care and maintenance. You can clean it with a mixture of dish soap and water. Due to the material content and durability, this product ought to last for years. When not in use, fold or roll up and stow away. We roll ours in place, keeping it attached to the boat so it is always ready for use.
All you have left to do is enjoy your shaded aft deck!
Comments